Last Updated on December 4, 2022 by Tech Questions
If you’ve been using an Acer X193W monitor and suddenly find that it says “Input Not Supported,” don’t panic. This is a relatively common problem, and there are a few things you can try to fix it. First, check to make sure that your cable is properly plugged in at both ends.
Next, try a different input on the monitor (if available). If neither of those solutions works, there’s a good chance that the problem is with the monitor itself.
If you’re having trouble getting your Acer X193W monitor to work, it could be due to a problem with the input. The most common issue is that the monitor isn’t receiving a signal from the computer. This can be caused by a few different things, so it’s important to troubleshoot and find the root of the problem.
First, check all of the connections between your monitor and computer. Make sure that the cables are plugged in securely and that there are no loose ends. If everything looks good there, try restarting both your computer and monitor.
Sometimes this will reset any connection issues and allow things to start working properly again. If you’re still having trouble, it’s possible that your Acer X193W doesn’t support the input you’re using. Double check the manual or specifications for your model to see what inputs are supported.
If none of them seem to work, then you may need to get a new monitor altogether.
How to Fix Input Not Supported Display Monitor Windows 10
Why Does My Acer Say Input Not Supported?
If your Acer monitor is displaying the message “Input not supported,” it means that the resolution or refresh rate of the video signal from your computer is set too high for the monitor to display. To fix this, you will need to adjust the resolution or refresh rate of your video signal. The first thing you should do is try lowering the resolution of your computer’s display.
To do this in Windows, go to Start > Control Panel > Appearance and Personalization > Adjust screen resolution. Then, under Resolution, move the slider to a lower setting and click Apply. If that doesn’t work, try lowering the refresh rate of your monitor.
This can usually be done by accessing your monitor’s on-screen menu (usually accessed by pressing a button on the monitor itself). Once you’re in the menu, look for an option called “Refresh Rate” or “Frequency.” Again, lower this setting and apply it.
Hopefully one of these two solutions will fix your problem!
How Do I Fix Input Not Supported on My Computer?
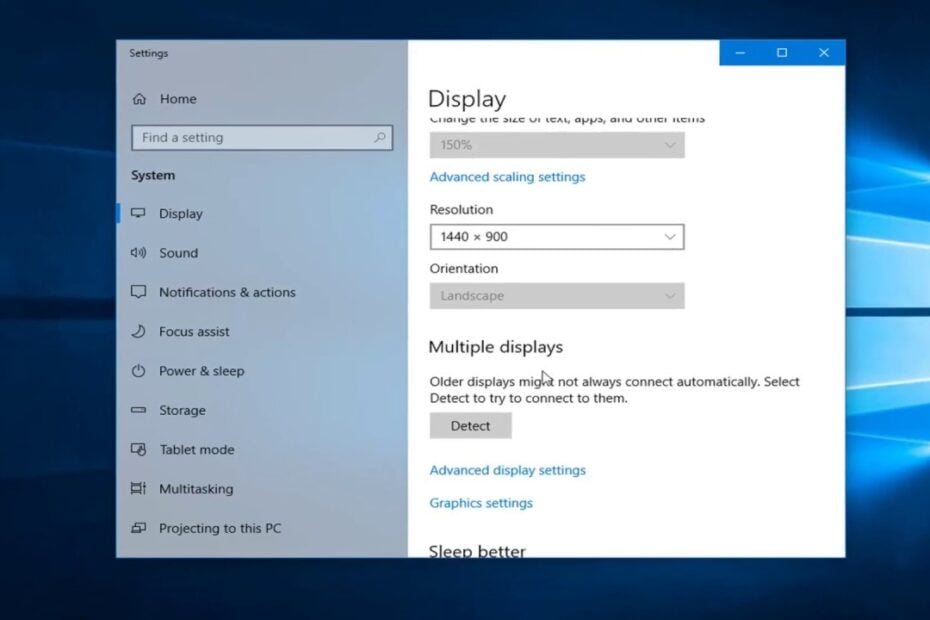
If you’re getting the “input not supported” error on your computer, it’s likely because your monitor is not compatible with the resolution or refresh rate that your computer is currently set to. To fix this, you’ll need to change the resolution or refresh rate in your computer’s display settings. To change the resolution in Windows, head to Start > Settings > System > Display.
Under “Resolution,” use the drop-down menu to select a different option. If you don’t see any other options besides the one that’s currently selected, try clicking the “Advanced display settings” link at the bottom of this window. From here, you should be able to access additional resolution options.
Once you’ve made your selection, click “Apply” and then “OK.” If changing the resolution doesn’t fix the problem, you may need to adjust your refresh rate. This can also be done from within Windows’ Display settings window; just scroll down a bit until you see the “Refresh rate” section.
Use the drop-down menu here to select a different refresh rate; again, if you don’t see any other options besides what’s already selected, click “Advanced display settings” and then look for additional options under Refresh Rate. Once you’ve found an option that works, click “Apply” and then “OK.” If neither of these solutions works for you, it’s possible that there’s an issue with your graphics card or driver.
Why Does My Screen Says Input Not Supported?
If you’re seeing the “input not supported” error on your screen, it’s likely because your display settings are set to a refresh rate that your monitor can’t handle. To fix this, you’ll need to change your display settings to a lower refresh rate. Here’s how:
First, right-click on your desktop and select “Display Properties.” Under the “Settings” tab, find the “Screen Refresh Rate” drop-down menu and select a lower refresh rate. If you’re not sure what refresh rate to choose, start with 60 Hz and work your way down until you find one that works for you.
Click “Apply” and then “OK” to save your changes.
How Do I Change My Acer Input to HDMI?
If you have an Acer computer and want to change the input to HDMI, there are a few things you need to do. First, make sure that your HDMI cable is plugged into the HDMI port on your computer. Next, open the Control Panel and go to Display Settings.
Under the Display tab, find the setting for Input Select. Change this setting from Analog to HDMI. Finally, click Apply and then OK to save your changes.
What if, Acer Input Not Supported HDMI
If you have an Acer computer and you’re trying to connect it to a TV or monitor via HDMI, you may be getting the “Input Not Supported” error message. This can be frustrating, but there are a few things you can try to fix the problem. First, make sure that both the computer and the display device are powered on.
Then, check that the HDMI cable is firmly connected to both devices. If it’s loose, tighten it up and see if that fixes the problem. If your computer has more than one HDMI port, try connecting the cable to a different port.
Sometimes one of the ports might be faulty and causing this error message. Finally, restarting both the computer and the display device can sometimes fix this issue. Once they’re rebooted, try connecting again via HDMI and see if it works.
If none of these solutions work, then there may be an issue with your computer’s graphics card or drivers. You can try updating your drivers or contacting Acer support for further assistance.
Acer Monitor Input Not Supported MAC
If you have an Acer monitor and a Mac computer, you may have come across the “Input Not Supported” error message. This can be frustrating, but there are a few things you can try to get your monitor working again. First, make sure that the cable connecting your monitor to your Mac is secure.
Sometimes this error can occur if the connection is loose. If the cable is plugged in tight and the problem persists, try restarting both your computer and monitor. This will often fix the issue.
If restarting doesn’t work, there may be a problem with your Mac’s display settings. To access these settings, go to System Preferences > Displays. Under the “Display” tab, make sure that your Acer monitor is selected as the primary display.
If it’s not, select it and then click on the “Arrangement” tab. From here, you can drag your monitors into their proper positions – your Acer should be positioned to the left of your Mac’s built-in display. Once you’ve done this, close out of System Preferences and see if the problem has been resolved.
If you’re still seeing the “Input Not Supported” error message on your Acer monitor, there may be an issue with its drivers or firmware.
Conclusion
If you’re using an Acer X193W monitor and having trouble with the input not being supported, you’re not alone. There are a few things you can try to fix the issue. First, make sure that the monitor is properly plugged into the computer.
If that doesn’t work, try adjusting the resolution or refresh rate in your display settings. If those don’t work, you may need to update your video drivers or replace your monitor.
I am a tech enthusiast who loves to write about the latest trends in the tech world. I am also a big fan of computer gaming and enjoy spending my free time tinkering with new software and hardware. I believe that technology can change the world for the better and I am always excited to learn about new developments in this field.